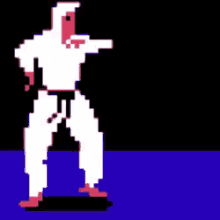
Kaiser 1357 Popular Post Share Posted January 18, 2021 Hello. Would you like to learn how to make semi-decent skins in little to no time, for free? Well this guide will help you at making your own skins easily.Disclaimer: I am not a professional skinner. Professional skinners will probably come into this thread to give (hopefully) constructive criticism -- but this guide is meant for A) newer players who need a passable skin, and B) Poor people who just want to wear something other than a potato sack but can’t afford skins via $ or minas. I have made a total of 4 skins, but they all look pretty banger considering I’m a newbie so take this guide for what you will. Lastly, this is also filled with tips I thought aren’t around openly but can be good for skinners. Good? Good.Step 1: What you’ll need.You’re going to need four simple things before we continue: A site/program to edit skins (your choice), GIMP/Photoshop, a shading template, and a reference picture.What site should you use? It depends. I use Novaskins.com but that’s based on nothing but preference. I know people that use only photoshop to edit skins, I know people that use multiple different sites. It’s really up to whatever you like, but for the sake of this guide, I/we will be using Novaskins. Feel free to follow along on another site/program though.Why Gimp/Photoshop? Why the shading template? Well, shading is, in my opinion, the hardest part of skinning, and I think many would agree. So, as this is your first (probably) skin, we’re using a shading template. Don’t worry, we’ll take the training wheels off another day, but this is a guide for dummies. We’ll use it in conjunction with gimp (that’s what I’m using, but photoshop works fine too) to add the texture to your skin.A reference picture? Of course, to design your skin off something. Skilled skinners can freeform a skin, but you can’t count to ten without looking at your fingers, so use a reference picture. It doesn’t matter where you get it, but I suggest something simple to start off with. Nothing too elaborate, or with fine details. For this guide, we’re using this picture: Step 2: Skinning beginsSo I like to start with the chest, so we’ll start there. You want to skin in layers. Bottom layer of clothing first, then second, and so on. Some people start with the literal skin, but I prefer doing clothing first and porting it over to a ‘skin’ skin afterwards. But it’s up to you. Here I made a white undershirt. You can see for the neckline I made it darker around the outline. This is to define the ‘seam’ of the clothing. You can do this on any part where there’s a seam to make it look more defined and show it’s the end of the cloth. I made the color very slightly pinkish, because flat colors like pure white can be jarring when compared with other colors. I also made the sleeve lengths different, to show that one is rolled up - sometimes asymmetry adds to your skin, don’t forget that! Next, I created the ‘vest’. I added a darker seam as I did with the shirt. I also added seams on the shirt’s sleeves. You can also see I added a lighter shade on the belly portion to indicate pockets. You’re dealing with a limited number of pixels, so sometimes you have to use your imagination -- but USUALLY people will get what you’re going for with things like this. A big tip: experiment! Sometimes ideas won’t work out, and sometimes you’ll get something unique to your skin alone, but you have to try. Remember, you always have an eraser tool! Here I moved on to the legs. I added a bit of the shirt coming out from under the side of the vest, and then on the opposite side the vest ‘lifting’ a bit. Details like this add to what the skin is, if I had left it flat it’d be less interesting. As for the pants, I made them a dark brown to contrast with the white/tan of the upper body.Side note: Colors and how they match is important. I can’t explain the history of color codes, how they all match, etc, but simply put you can look up online easily what colors contrast with what. Otherwise, use a premade palette of colors that artists have precompiled. There’s a lot of information and tools for color use online. In short, don’t use hot pink and neon green together. I’m a fan of boots, so I gave the outfit a pair, which I made black. I added grey studs for metal straps. Tip: Don’t use flat grey, add a tiny bit of blue for that metallic look! I also added slight shading on the shirt, as well as the pants. Also note that I made the hem of the boots darker than the lower portion. Usually it’s a good idea to contrast the outer layer with the inner layer, because the colors, when shaded, are more defined against each other. Don’t go overboard, just a few shades darker/lighter will do. Next I moved onto the upper body’s outer layers. It’s a bit hard to see so I’ll explain what I did. I used a slightly darker white to create a ‘plus’ shape around the outer layer of the clothing. This creates depth. Depth is important to skins to understand many things, such as how far the clothing is from the body, it’s size, it’s shape, etc. A skin with NO use of it’s outer layer will look worse than one which does make use of it. Remember, depth is key, flatness is ugly. That doesn’t mean you have to make everything apart of the outer layer, some things can do without them, but don’t ignore it! For the chest I added very light layering for the seams, and I added a few buttons for detail. I also made the under layer of the seam have lighter pixels to represent the button-holes. So together it looks a bit like this. My final task was adding the bag. I won’t bore you with the details, I simply added a light brown strap around the chest/back, and added a dark brown bag. I did add a bit of layering on the bag to make it look thicker. Step 3: Shading (kinda) We’ll be using a shading template. Shading is for another tutorial… Just stick with this template for now. Finally we throw the skin file into gimp. We throw the shader template ON TOP of the skin file. Then we use our eraser tool, putting the force on 10. We then use the eraser tool to ‘click’ a few times on the shader template. This makes it semi-transparent, and thus shades the skin. The more you click, the more you erase, and the more you erase, the less shaded the skin becomes. On force 10, I clicked this particular skin 8 times. There are a lot of different shading templates so use whatever one you like. This one’s been around lotc a while, and a lot of skinners look down on templates, but don’t worry about them. I’ll teach you real shading another day, but for right now don’t let anyone shame you for it. Export the file together and you’ll have a semi-done skin. Throw it into a program (like Novaskins) and delete the translucent pixels that remain, usually on the outer layers, while leaving everything else. This is what we got! Not bad, the pants came out a bit grey rather than brown, but it blends into the boots in a way I like, so not a big deal. However, this skin template (and most) suck out the saturation from the skin. So, we go back to GIMP! Hit color, and then Hue_Saturation. Raise the saturation up until you like the colors, but 25 fits well for me for this skin. Export it, and add your head/skin/body of your character! And, done! This is what we got. Make some final small additions/changes, and you’re done. Took around 30 minutes for me, and it’s not too shabby for 30/40 minutes and no skill. Hopefully this walkthrough has put some ideas in your head! Additional Advice/Tips/OverviewDepth is important to making a skin feel alive. Utilize the outer layer, and even use shading to imply depth to a skin. Research which colors compliment each other, and which contrast. Use color palettes artists construct online as guides.Experiment. Try new things and ideas that you’ve never seen, it might work out. Take inspiration from other skinners but DON’T copy! Copying a skin is, in my opinion, bad taste. However, you only have so many pixels to work with, so what is ‘copying’ and what is ‘inspired by’ is up for debate, just try not to blatantly steal! Take what they made and turn it around with your own flavor. Use reference art. Seriously, otherwise you’re flying blind. Try to avoid flat/negative space. Anything that seems FLAT, try to add some sort of detail to liven it up. You can make a skin look too cluttered, but it’s worse to make it too empty. Understand the rule of color tricks. Sometimes colors next to other colors appear to be darker/lighter when they in fact aren’t. Sometimes you need to make your skin’s colors different shades so that they appear the same shade. See picture below. Put your finger in between the two blocks and notice how they’re actually the same color. Here’s the shaded template, but there’s a lot of them online. Try a couple out. Finally: wear (and make) a skin you enjoy. If you like it, don’t let anyone tell you it’s poorly made because it’s shaded with a circle motion when REAL skinners use vertically slanted sha- blah blah blah. Also, feel free to style your skin after this one, but try to make your own. I don’t want a bunch of look alikes running around my city ;) 31 Link to post Share on other sites More sharing options...
Shmeepicus 3942 Share Posted January 18, 2021 Based, down with the monopoly! Marx would be proud! 4 Link to post Share on other sites More sharing options...
NLThomas 1065 Share Posted January 18, 2021 Time to try and skin to just disappoint myself again, lets go. 5 Link to post Share on other sites More sharing options...
NotEvilAtAll 9945 Share Posted January 18, 2021 once I skinned my character's man nips in a swimsuit skin. it was my proudest skinning moment. @froeggy also how do I graduate from being a bu*lder and turn into an epic skinner Link to post Share on other sites More sharing options...
ydegirl 1757 Share Posted January 18, 2021 hi im a semi experienced skinner. i've been skinning for ~3 years now, starting in 2018. i don't think a shading template is the best way to skin. perhaps it's good for beginners, but once you develop a style of your own and do more complex skins (such as cloaks, folds, etc) you're going to need a better understanding of how to shade them. i don't dislike anyone who uses a shading template but there comes a point where one must move on from a shading template. also i'll leave some advice for some newer skinners: join a discord (like mine, or ivorey's) and ask for critique. also experiment with skins, go outside ur comfort zone. (this isn't meant to be rude or mean or whatnot pls dont take it that way) 5 Link to post Share on other sites More sharing options...
Kaiser 1357 Author Share Posted January 18, 2021 2 minutes ago, froeggy said: hi im a semi experienced skinner. i've been skinning for ~3 years now, starting in 2018. i don't think a shading template is the best way to skin. perhaps it's good for beginners, but once you develop a style of your own and do more complex skins (such as cloaks, folds, etc) you're going to need a better understanding of how to shade them. i don't dislike anyone who uses a shading template but there comes a point where one must move on from a shading template. also i'll leave some advice for some newer skinners: join a discord (like mine, or ivorey's) and ask for critique. also experiment with skins, go outside ur comfort zone. (this isn't meant to be rude or mean or whatnot pls dont take it that way) Not rude at all! PM me your discord/discord account, I'd love to join it. :) 1 Link to post Share on other sites More sharing options...
niya 180 Share Posted January 18, 2021 imagine being artistically challenged.. 1 Link to post Share on other sites More sharing options...
Devdog 390 Share Posted January 18, 2021 I love the template! Thanks for sharing your information, skills & techniques you've picked up! This information can certainly be called a gateway into making very high quality skins. 27 minutes ago, Kaiser said: "I have made a total of 4 skins" I'mma giggle at this for a moment too 1 Link to post Share on other sites More sharing options...
osumanduas 1436 Share Posted January 18, 2021 (edited) Skinning is easy af, there isn't any 'unique style' use a template or use a photoshop tool like gimp either one is braindead simple. The problem is time. I don't want to waste like two hours on something like how my mineman aesthetic looks. I'd rather just get someone else to spend their time doing it. Edited January 18, 2021 by osumanduas Link to post Share on other sites More sharing options...
Yaldabaoth 743 Share Posted January 18, 2021 Skinning is like any other hobby/skillset, you've just gotta practice, it doesn't take that long before a completely new skinner will be capable of skinning well. "The more you practice the better" is valid for both new and old skinners alike. That being said, don't think I've seen a guide like this, good idea. 4 Link to post Share on other sites More sharing options...
Potatatoes 168 Share Posted January 20, 2021 I- I- I- I believe I have become a simp... Link to post Share on other sites More sharing options...


.thumb.png.00cf361d731ebf14740bbca5d3ad44f4.png)
Recommended Posts